Overview
The Bigtincan Hub appliance supports SAML 2.0 authentication and is able to act as a Service Provider, allowing customers to leverage their own authentication systems.
Bigtincan hub has one endpoint, used for all hub interfaces.
When users attempt to log onto the bigtincan hub instance they will be automatically redirected to the specified Identity Provider (IdP) and will return to where they left off.
This guide provides step-by-step instructions on having bigtincan hub as the Service Provider with Azure AD acting as the Identifier Provider.
Terminology
|
Term |
Meaning |
|---|---|
|
IdP |
Identity Provider |
|
SP |
Service Provider (the bigtincan hub API server) |
|
<hub domain> DNS alias |
The domain / DNS name that the bigtincan hub instance is reachable on. e.g. https://[dns_alias].push.bigtincan.com (for a company on the bigtincan USA cloud systems) https://[dns_alias].push.bigtincan.com.au (for a company on the bigtincan APAC cloud systems) https://[dns_alias].push.bigtincan.co.uk(for a company on the bigtincan EU cloud systems) This value is configured on your bigtincan hub tenant by an administrator. |
|
SSO |
Single sign on |
|
SLO |
Single log out |
|
ACS |
Assertion Consumer Service |
Foreword
Please note that your Azure AD account must have a premium services license before you are able to proceed with the following steps.
A generic Azure AD SSO setup guide can be found on the Microsoft website.
Configuring single sign-on in Azure Active Directory
Adding an unlisted application
To connect an application using an app integration template:
- Sign into the Azure management portal using your Azure Active Directory administrator account
- Browse to the Active Directory > [Directory] > Applications section
- Select Add
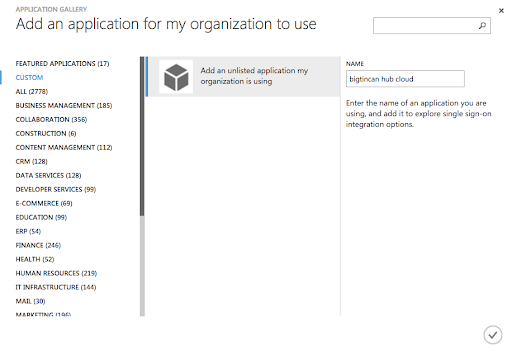
- Add an application from the gallery

In the app gallery, you can add an unlisted app using the Custom category on the left, or by selecting the Add an unlisted application link that is shown in the search results if your desired app wasn't found. After entering a Name for your application, you can configure the single sign-on options and behavior.

To start, select Configure Single Sign-On. The next screen presents the following three options for configuring single sign on, which are described in the following sections.

Select this option to configure SAML-based authentication for the application. This requires that the application support SAML 2.0, and you should collect information on how to use the SAML capabilities of the application before continuing. After selecting Next, you will be prompted to enter three different URLs corresponding to the SAML endpoints for the application.

The following URLs will be required, please note that in this example the DNS alias is set to “sampleco”.
|
Sign on URL |
https://<dns_alias>.app.bigtincan.com |
|
Identifier |
https://<dns_alias>.push.bigtincan.com/saml/metadata |
|
Reply URL |
https://<dns_alias>.push.bigtincan.com/www/index.php?url=/saml/acs |
Your DNS alias will be configured on your bigtincan hub tenant and provided to you by an administrator.
*Note: URLs will be different depending on which bigtincan region your tenant exists on
Generate a certificate.

The final screen will show the following:

These values will need to be configured on the bigtincan hub side.
Please note that the Azure AD SAML Metadata XML format is currently not readable by bigtincan hub; these values will need to be manually entered by an administrator.
Download the Certificate (Base 64), open this file in a text editor and copy the text.
Set up bigtincan hub like the following:


|
bigtincan hub Field |
Azure AD Field |
|
Entity ID |
Issuer URL |
|
Single sign-on URL |
Single sign-on service URL |
|
Single log-off URL |
Single sign-out service URL |
|
X.509 public certificate |
Download Certificate (Base 64) > copy text |
Save these details in bigtincan hub and go back to Azure AD.

Click “Confirm that you have configured single sign-on as described above. Checking this will enable the current certificate to start working for this application.” and click next.
After clicking next, Azure AD will take around 30 seconds to continue.
Configure an email address for notifications.

Assigning users and groups to your SAML application
Once your application has been configured to use Azure AD as a SAML-based identity provider, then it is almost ready to test. As a security control, Azure AD will not issue a token allowing them to sign into the application unless they have been granted access using Azure AD. Users may be granted access directly, or through a group that they are a member of.
To assign a user or group to your application, click the Assign Users button. Select the user or group you wish to assign, and then select the Assign button.

Assigning a user will allow Azure AD to issue a token for the user, as well as causing a tile for this application to appear in the user's Access Panel. An application tile will also appear in the Office 365 application launcher if the user is using Office 365.
Select users or groups and click Assign.
Customizing the claims issued in the SAML token
When a user authenticates to the application, Azure AD will issue a SAML token to the app that contains information (or claims) about the user that uniquely identifies them. By default this includes the user's username, email address, first name, and last name.
You can view or edit the claims sent in the SAML token to the application under the Attributes tab.

Add the following attributes, and click Apply Changes.

For additional SAML attributes please refer to the bigtincan hub SAML 2.0 Guide.
Testing SSO
Once Azure AD and bigtincan hub have been set up, navigate to the following URL:
https://<dns_alias>.app.bigtincan.com*
An Enterprise single sign-on option will be visible.
*Note: this URL will differ depending on which bigtincan hub region your tenant exists on
Comments
0 comments